Battery size may vary so double check before you crack into it. I used a 9.6v 1700mah nunchuck battery from Airsoft Extreme. Also this is not the easiest mod to do, it does require some knowledge of putting a battery pack together as well as working with a drill or dremel and soldering.
Tools Here is a list of tools that were used for the mod:
-Phillips head screwdriver -Small flat head screwdriver x2
-Putty knife -Pliars
-Wire cutters -Utility knife
-Small metal files -Metric allen key
-Drill or Dremel -Drill bits and a bit for removing plastic
-Soldering iron -solder -Wire
-Battery solder tabs -WD-40
-Vice -Molex pins
-Extra male/female battery plug -Hot glue
-Heat shrink tubing -Level
-Lighter -Grinder
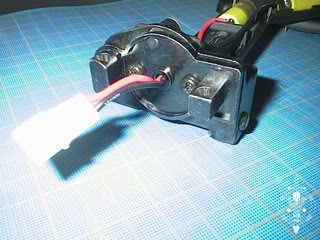
Disassemble Start by pulling the two pins and taking the stock off. Next unscrew the back plate from the stock, there are two large screws. Then take a small allen key and remove the set screw from the folding stock. Next slide out the metal post that the stock pivots on and remove the spring.
Now its time to open up the stock. The stock has a series of small metal roll pins all along the length of the interior, about 10 in all. These help hold the stock together and are very important when the mod is complete. There are also a number of interlocking teeth on the inside of the seam, mine had a little bit of glue holding them together. Then to top it all off the stock also has 8 plastic pins in the center that are glued together. This was the hardest part of the mod. I used a small thin flat head screwdriver and ran it down the length of the seam a few times to start opening up the stock. Then it is a matter of inserting thin tools like a putty knife into the stock to pop the plastic pins apart. It is not too bad if one breaks because you can glue them back in, however its a lot easier if they do not break.
You could build your own battery from scratch or you can take one apart. I chose to take one apart since I had an extra one. The cells were doubled up in the nun chuck so I left three of them together and split the last one into single cells.
________________________________________
Now you have two halves of the stock and the metal end piece. Start by taking the side of the stock shown and grabbing a pair of small cutters. Remove the plastic center pins #1, #2, and #3, as well as the small pin #4. Make sure to cut these and not snap them off since they could break all the way through the stock. Then file down smooth the area where the pins were.
Next you will need a drill with a bit to remove plastic or a dremel. Take two of the battery cells put them in the top of the stock, marked in green #5, and mark each end of the battery on the stock. This is the area that will need to be thinned out. Don't go too deep or you will have a custom window in the side of your stock! It only needs to be deep enough to allow the two halves to close with the batteries in the middle. Repeat this on the opposite side of the stock.

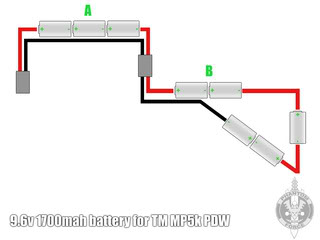
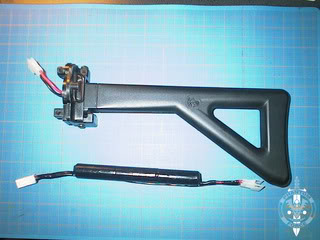
This is a diagram of the wiring for the two part battery. Battery A is pretty simple just assemble three of the cells in stick formation. I re-used the cell with the positive wire and battery gun plug as my top cell in battery A. Solder a section of wire about 6" long at the opposite end of Battery A for your + and leave it for later. Next you will need a section of wire for your - that is as long as battery A from the gun plug to the end of the wire you soldered. Crimp a molex pin on the end of your - wire and plug it into the gun connector then run it down to the end of the wire you soldered. Next put a section of heat shrink tubing over the length of the battery and heat it until it shrinks down.
Battery B is a little tricky, you need to lay the cells in the stock where they will sit and cut sections of wire to attach each cell. I did this part one at a time, cut the section of wire, solder it on and make sure it still fits. Also make sure to leave about a good 8"-10" of wire at the ends to run through the stock.
Make sure that the two halves of the stock close with the battery cells in the middle. Also put a bit of hot glue on the top cell in battery B so that is does not touch the metal part of the stock.
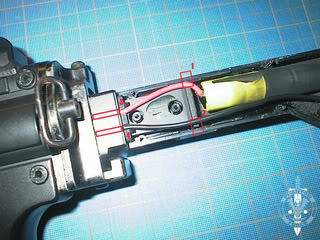
Now we need to modify the metal end piece. Make sure that you are working on the same side of the metal piece as shown in the picture otherwise it will not work and you will be out a stock. Start by grinding off corners #1, and #2. This will allow the wires to run through the piece when the stock halves are put together.
Next you will need to drill through the metal end piece. The size of the drill bit depends on the thickness of the wire you use. I would suggest marking and double checking before you drill. It is very difficult to explain this part so it will take a bit of imagination. You want to drill so that the bit comes out on the same plane as the two holes for the stock and in between the two small reinforced sections on the piece at #3, and #4. I would recommend putting the piece in a vice and checking it with a level, also it would not hurt to spray a little bit of WD-40 on the bit.
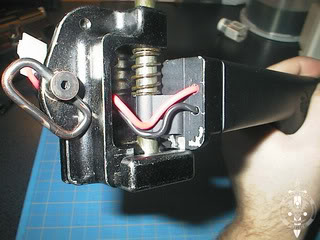
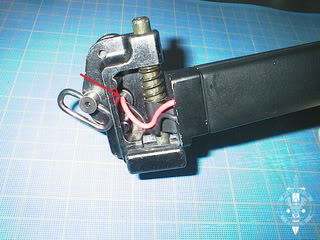
This is how the stock should look with the wires ran through, the two halves closed, and the part reassembled.
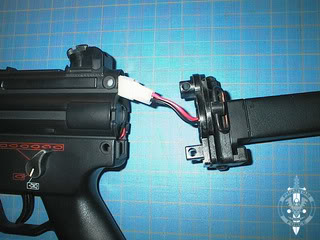
The TM MP5k PDW has a hole in metal end cap on the gun that was just right to fit the wires through. Make sure that the wires have enough slack by folding the stock all the way over. When the stock is closed there is room between the stock pieces for the wires to hide.
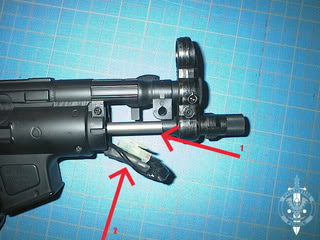
Next you will need to slide battery A into the MP5 all the way. Trim the wires at the end of battery A so that they stick out of the back of the gun a little, crimp molex pins on the ends and put them into a connector.
Next you will need to put the stock up next to the gun to see how long the wires need to be. The idea is that battery A is shorter than a normal stick battery to allow room for an extra connector between the two batteries. Next crimp molex pins on the ends of the wires and put them into a connector.
Here are your new batteries for the MP5!
There is just enough room between the metal end cap and the mechbox for the wires to sneak up to the other battery. Plug the batteries together and push the connector into the gun while you put the stock back on.
I still have a fuse in my MP5, they are very important, but I removed the bulky plastic piece it was attached to and simply put a section of heat shrink tubing over it. This allows a lot more room up front.
That's it! In all it took about five hours to complete. The only sign of the battery is the wires when the stock is folded over.

You can either use all black wires or cover the wires with something and they are nearly undetectable.
The stock is a lot stronger and the whole gun has a different weight to it. This also really opens the doors for big mechbox upgrades.
Provided by the Phantom-Force Team Phantom-force.com